


What do live events like the 2020 Tokyo Olympics, the Cannes Film Festival, and the 74th Annual Tony Awards have in common?
That’s right. They were all cancelled due to COVID-19.
Closer to home, you may have had to cancel your own marketing event, sales conference, or regular meetup. Travel plans are cancelled, the build on your booth has been halted, and you have no idea if or when you can reschedule at a good time for all your attendees.
But you have another option.
Virtual events have been on the rise over the last decade, largely thanks to improvements in internet bandwidth and video conferencing quality. (We’d argue that all that swag had something to do with the popularity too…)
To help you take your live in-person event from “postponed until further notice” to an awesome virtual live event, we’ve put together a list of actionable steps to take your conference online:
- Know your audience
- Decide on a format
- Audit your tech
- Make the joining experience easy
- Rehearse every moment
- Amplify the event
- Record and repurpose
Shopping for a video conferencing tool? (Or just curious about what to look for?) Grab the free checklist to help you choose the right one for your team or business.
1. Know your audience
The first thing to consider when preparing the switch to a virtual event is your audience.
With in-person events, you know attendees are going to be in the building with you. For online events, on the other hand, your attendees have other options and an infinite list of distractions.
This makes it important to know what platforms your audience uses and what their behaviors are like during a normal working day.
For example, if your event is targeted at sales professionals, avoid Monday mornings when sales teams get together and discuss KPIs from the previous week.
If your audience is weekend golfers, you know they’ll likely be on the course Saturday or Sunday.
Once you’ve decided when your audience will be most engaged, you need to decide where they will be most engaged.
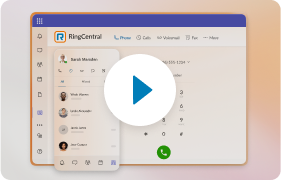
It’s important to have a core platform to run your live event or meeting. Video conferencing platforms like RingCentral Video make it easy to prepare, run, and join an event.
You can schedule a video meeting directly from the RingCentral desktop app:

Other than your core video platform (like RingCentral Video), you should also identify other social platforms that your audience uses for watching live video. Even if they don’t join your live event, you’ll want to be broadcasting on the platform they most actively check.
Here are a few of the other popular live video platforms:
- Instagram Live
- Facebook Live
- LinkedIn Live
- TikTok
- Twitter Live
- YouTube Livestream
Find out where your audience spends most of its social media and video time by conducting a simple survey with tools like SurveyMonkey or Typeform.
🕹️ Get a hands-on look at how RingCentral works by booking a product tour:
💰 You can also use this calculator to see roughly how much your business could save by using RingCentral to support your team’s communications with clients, customers, and each other.
2. Decide on additional formats
Here are other commonly used formats that offer great experiences for online attendees:
Your audience will help you define the type of event you should choose.
Webinars
Best used for broadcasting to a niche audience that has specified an interest in the topic you are going to present, webinars tend to be one-way conversations as the speaker presents the topic to the online audience.
That being said, it’s easy to pose questions to the audience and you can host a scheduled or unscheduled Q&A at any point. All you need to do is un-mute your attendees.
Virtual conferences
Virtual conferences are ideal when you have multiple sessions offered at the same time. If your original event was going to feature different sessions from different speakers, there’s potential for a clash in schedules.
Virtual conferences are typically made up of multiple sessions so that attendees can tailor their experience based on the topics most important to them. This replicates the experience they’d get at an in-person event—you might want to attend the marketing talk whereas your sales colleagues will be at a different session more specific to their needs.
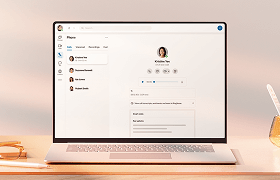
Here is an example of Amrit, our SVP of Marketing, being scheduled to speak at UC Summit. You’ll see he is one of a number of speakers—so the audience can choose the speaker and topic of their choice.
Town halls
If the content you want to present is one-way, you might want to consider a traditional town hall format. Here, a single speaker or group of speakers broadcast messages to a passive audience. This is most useful for company-wide messages—like informing your team that the offices will be closed for the next two weeks.
Typically used in an internal environment, a virtual town hall is a perfect alternative to gathering your whole business together at the beginning or end of the day.
In a virtual town hall environment, it’s a best practice to enable one-way audio or ask everyone to be muted until the Q&A session.
3. Audit your technology
Once you’ve decided when and where your audience is most likely to join your live event and the format it will take, it’s time to make sure your technology is up to the job.
When you’ve attracted a good number of attendees, the last thing you need is your technology to let you down.
Here’s a quick checklist to use as a guide.
Internet
When hosting a video event, you need to make sure you have enough bandwidth to run the meeting. We’ve run a ton of online events, and we’ve provided a few guidelines below, but of course, the more bandwidth you have available, the better.
- 1:1 video calling: 600kbps (up/down) for HQ video and 2 Mbps (up/down) for HD video
- Group video calling: 600kbps/2 Mbps (up/down) for HQ video
- Group audio conferencing: up to 60 kbps
It’s also important to make sure your attendees are prepared on their end to minimize any hiccups that might associate your live event with a poor video experience. Here are a few suggested bandwidth requirements:
- 1:1 video calling: 600kbps (down) for HQ video and 1.2 Mbps (down) for HD video
- Screen sharing only (no video thumbnail): 50-75kbps (down)
- Screen sharing with a video thumbnail: 50-150kbps (down)
Microphones
Even state-of-the-art laptops and PCs don’t have microphones designed for broadcasting to live attendees.
Thoroughly test your microphone setup with other people on your team before you push ahead with your live event. Make sure you test in a range of environments too to allow for all possibilities.
If you don’t have a mic, here are a few recommendations:
This is a portable speakerphone that can be easily transported; connect via USB or bluetooth
Optimized for hands free calling and ready for 15 hours cordless talktime
Includes technology that detects the speaker’s voice so callers hear you—not your background.
Fun fact: These are all compatible with RingCentral Video, which means you can get started right away. No need to play around with settings or hire an expert to help you get setup.
Video equipment
You’re being heard loud and clear. The next step is to make sure you’re seen as crystal clear as possible too.
Just as you should test your microphone setup, make plenty of test video calls with different numbers of participants to strength-test your internet connection and video equipment.
Typically, your laptop or PC won’t have the best webcam installed. Below are suggested webcams that are all compatible with RingCentral Video:
Designed for business, a 1080p webcam with wide field of view and digital zoom
Uses AI to create intelligent, wide-angle video calls without you having to adjust your setup.
4. Make the joining experience as simple as possible
You’ve done all this prep work. Don’t drop the ball right when the event is about to begin.
Make sure it’s easy for your attendees to join! The last thing an attendee wants is to have to install multiple applications and adjust their audio settings.
For example, platforms like RingCentral Video generate a URL for all your attendees to use. This means they can join your online event with a click:

For people who for some reason can’t attend your online video meeting using the link, RingCentral Video auto-populates local and internal dial-in codes too. This means they can dial-in and listen while they’re on the move—rather than miss the event in real-time.
5. Rehearse every element of your live event
Now that you’re running a virtual live event, you may find yourself acting as producer and director as well as a speaker.
Dedicate a good amount of time getting to know your new technology setup. Become familiar with the basic audio and video settings (then master the advanced settings).
In RingCentral Video, for instance, you can master the art of video meetings pretty quickly—all the settings are in one menu:

Here, you can choose to optimize your content sharing for single or dual monitors. This is useful if you’re conducting something that requires multiple screens to show a product—like in a sales demo.
Checking Enable screen sharing with GPU acceleration makes playback the best quality it can be. (GPU stands for Graphics Processing Unit).
You’ll also have a few options to give your attendees a smooth joining experience.
By checking automatically join audio by computer, you don’t need to dial-in to the video call via phone.
If you check Always mute microphone when joining, you remove the risk of any background noise when attendees join.
The next tab down is video settings. This is where you can take your video event to the next level.
Here, you can choose your external webcam over the laptop’s built-in webcam and change the ratio from original to widescreen. This will help fit the screen better when you’re broadcasting live:

By selecting Enable HD, you’re guaranteeing the best video quality possible from your camera. The Enable mirror effect option ensures that the viewer has the best experience. Without this option ticked, any signage or logos will be seen back to front.
6. Amplify your event
According to research by Adobe, registrations tend to spike two to three weeks before an event. This means, in addition to that initial promotional push, you should focus on amplifying your live event all through the build-up too.
By keeping registered attendees that have already registered engaged, they’re more likely to attend because your event is top of mind.
To drive even more registrations, try marketing your event as “just around the corner” or “coming soon” so that potential attendees feel a reason to sign up now—rather than later (and they might forget later on too).
Here are a few ways to amplify your event:
- Encourage internal staff to share on LinkedIn—connections of connections are more likely to attend than people who see your LinkedIn ads but have never heard of you
- Find LinkedIn groups relevant to your topic and post about it there
- Email existing customers and prospects
- Follow Twitter users who might be interested in attending and invite them
- Participate in Reddit discussions on your topic
- Advertise in industry publications
7. Record and repurpose your virtual event
Having a videographer record every single session can get pretty expensive when you’re running an in-person event.
If you’re doing an online event with a platform like RingCentral Video, though, you can record every session with the click of a button. (Which makes recording for distribution later to people who missed the event really easy.)
When recording is enabled in RingCentral Video, you can click Pause or Stop Recording right in your event window. Once the event ends, the recorded file will be saved:

It’s almost always a good idea to have these events recorded, because you can use these later on to gather more leads and get potential prospects to trade their contact info to watch, say, a really interested webinar that you’ve recorded.
Once recorded and edited, you can send your video to attendees that were busy watching your other sessions and make these available on-demand on your YouTube channel, or in other marketing campaigns!
Ready to run virtual events without a hitch using RingCentral Video?
Once you’ve worked through the steps above, you’re ready to start mapping out your virtual event.
Happy planning!
Updated Jun 30, 2025