


At just 9 years old, Ryan Kaji became the youngest YouTube millionaire, pulling in an estimated $29.5 million from his 2020 video streams and racking up more than 45 million channel subscribers.
*Immediately reevaluates life decisions*
This fact just might beg the question: If a 9-year-old can live stream, how hard can it be?
The basics of live streaming –– delivering online video content in real-time –– actually aren’t that difficult. So why aren’t more streamers bringing in millions of viewers? Well, while nailing the fundamentals is relatively easy, orchestrating a high-quality, genuinely engaging live streaming experience requires a more detailed, careful approach.
This next-level skill set is invaluable in today’s marketing landscape. After all, watching a livestream is one of the most popular ways for people to consume content. In 2021, Google reported that 85% of people had watched a livestream in the last year.
With that in mind, live streaming can help you reach a wide audience. The medium also offers an effective way to keep your community members informed, entertained, and connected — all from the comfort of their own homes (or wherever they are in the world).
Since marketers know the benefits of live streaming (and basic live streaming is a relatively low lift in terms of production), your audience is likely choosing from a long list of streams happening simultaneously. So, delivering true value and nailing the details are paramount. Something as simple as the audio going out will have people dropping like flies from your stream.
Read on for seven practical tips to help you produce a top-notch livestream for your next event –– and, ultimately, get your content to stand out in the crowd. Then maybe, just maybe, you’ll snag your own 45 million subscribers.
Tip #1: Evaluate your equipment
The equipment you use for your livestream depends on the type of live event you’re hosting. Virtual events are the easiest lift because you only need your computer’s camera and microphone –– or, in an ideal world, an external camera and microphone –– to give it a professional feel.
If you’re producing a hybrid event, where you’re live streaming content from or to a physical event, there are plenty of factors to consider.
Cameras
When scouting cameras, first consider how to maximize your video quality against your budget. Some cameras sell for more than $80,000, so you’ll need to determine what you can realistically afford. The following cameras are commonly used to produce professional-looking streams:
- Webcams
- Camcorders
- PTZ cameras
- DSLR and mirrorless cameras
Tripods
Ever experienced motion sickness brought on by shaky video content? Wobbly video is every content marketer’s worst fear. To avoid undermining your content –– or worse, driving viewers away altogether –– keep your camera still by setting it up on a tripod. Depending on your setup, you might need more than one camera, which means you might need a few tripods.
The type of tripod you choose will depend on your camera, so check for compatibility when making your camera and tripod selections.
Microphones
You want your audience to hear your message loud and clear. Fortunately, there are more than a few microphone (mic) options to capture your presenter’s audio. If you’re streaming more than one speaker, and you’re worried about different speakers having different speaking volumes, look into getting an audio mixer. A mixer will help adjust each speaker’s levels and produce smoother audio.
We recommend getting a wireless mic and a receiver station for it. Choose a mic that accommodates your speakers’ presentation styles. Some options are:
Encoder
If you’re creating a livestream and want to use your event content again — an encoder is key. It converts your video from a raw format to a digital format that can stream online.
Beginner and mid-level streaming setups can use inexpensive encoding software that’s easy to navigate. But for a worry-free experience, encoder hardware is recommended. Simple and stress-free, hardware encoders do only one thing: encode. See examples of encoders here and here.
Additional equipment
Finally, gather all the extras you’ll need to design a functional and streamlined setup. Consider designating an accessories bin for miscellaneous equipment. Start your collection with these useful accessories:
- Extra batteries
- Extension cords
- Ethernet cables
- Network switches
- HDMI cords and splitters
- Gaffer tape (for locking down the cords)
Tip #2: Evaluate your venue
To make sure your venue is ready to roll for live streaming, review the essentials.
Internet connection
Whether your livestream is for a virtual, hybrid, or in-person event, make sure you have a strong internet connection.
In a physical venue, locate the internet source where you’ll connect your ethernet cable to provide the strongest connection possible. Depending on the venue, you may be charged to use the internet, so consider backup options like dedicated Wi-Fi hotspots.
Pro tip: Wi-Fi is a high-profile sponsorship opportunity so if Wi-Fi or hotspots come at a cost, consider asking a sponsor to cover it. They’ll get publicity and you’ll cut down on costs –– it’s a win-win scenario.
Once everything is set, run an internet speed test to check bandwidth for your location and for your virtual speakers. A good download speed is at least 25 megabits per second (Mbps), and a good upload speed is at least 10 Mbps.
Aim for more speed than you need, especially if you’re hosting the event. In which case, go for a faster upload speed than download speed because that’s the rate at which data will transfer from your computer to the internet.
Booth setup
Don’t get inundated by a mess of cables and physical hardware. Designate a hub where you can corral all the moving bits and pieces to help prevent cord overwhelm. When scouting a location for your headquarters, be mindful of power sources and where they sit within the venue.
Also, be aware of the physical limitations of any cables for your equipment. This is where extenders might come in handy. Note, though, that an ethernet cable’s connection starts to decline after 100 meters of cable.
Video-source stations
The number of video-source stations needed depends on the number of cameras or computer screens displaying presentations (or videos, websites, and so on). Consider finding a good video switcher that enables professional-quality camera-to-camera transitions.
When selecting space for your video stations, remember to find a spot with plenty of room for the folks behind the cameras. They’ll need maneuvering room to keep the speaker and content in focus and ensure the audience isn’t blocking the view.
Audio infrastructure
Ask if the venue provides speakers and microphones. If not, reference the equipment section above for the best microphones based on your type of event.
From there, look into audio mixing to avoid having audio and video out of sync.
An audio inserter can help with this. The inserter essentially helps bring audio and video signals together and creates a new audio-video signal through HDMI, ensuring both components are in sync.
Tip #3: Choose your live streaming platform
Whether it’s your first time streaming or you already have some experience, choosing the right platform is one of the most critical considerations. You’ll want a platform that’s flexible and reliable. It should allow you to:
- Have onscreen comments
- Stream pre-recorded video
- Download stream recordings
- Provide separate audio recordings
- Access at least five different video layouts
- Add and customize lower-third graphics
- Stream in full 1080p high definition (HD)
- Support multiple presenters in different locations
- Customize real-time messaging protocol (RTMP) destinations
- Track registrations and attendees in your customer relationship management (CRM) tool
Sometimes you’ll want to stream to multiple places. Let’s say, for example, you need to stream to a virtual event as well as Facebook Live, YouTube Live, and Instagram Live. In this case, it’s critical that your technology can simulcast, or push the stream to multiple destinations at once. Using an RTMP server enables seamless simulcasting by transmitting your live stream to multiple platforms simultaneously, ensuring stable connections, consistent quality, and wider audience reach across all channels.
RingCentral Events customers have access to StreamYard, which supports streaming to RingCentral Events’ virtual venue as well as social platforms like Facebook, YouTube, LinkedIn, Twitter, Twitch, and other custom RTMP outputs.
Tip #4: Configure your streaming software settings
The bulk of the work arrives when you go to configure your streaming settings –– yet another reason why choosing the right streaming partner is crucial.
Consider the overlays and branding you want to feature with each presentation. And make sure to pinpoint and test when to switch between certain camera angles and computer presentations.
Beyond that, there are a few other settings to consider.
Encoder configuration
Want your content to come through perfectly? Make sure you configure your encoder correctly. Consider the following settings:
Source inputs
Source inputs are different for every encoder or video platform. Once your encoder is set up, start connecting your cameras and mics to your encoder so they’re incorporated into your stream.
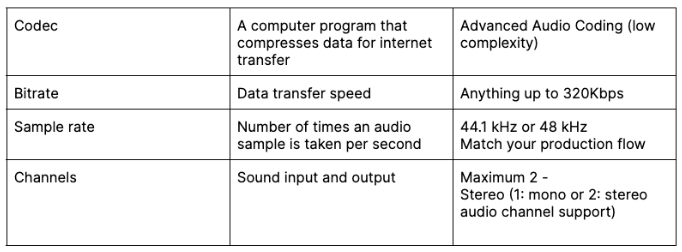
For audio, consider the following:
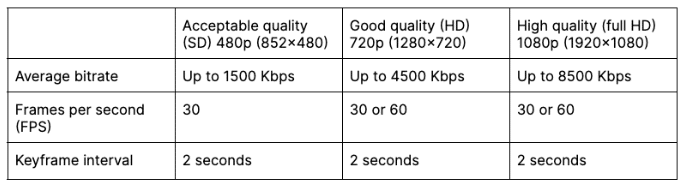
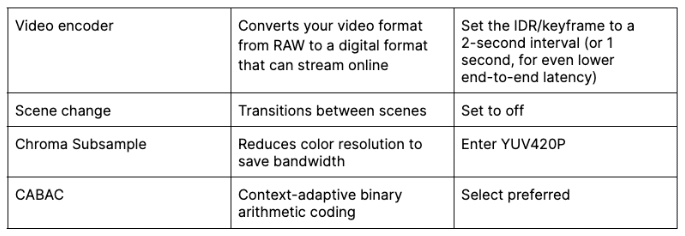
For video:
Livestream creation
Once your stream configurations are set, it’s time to actually create your livestream. Each platform is different, but you’ll typically create a stream within your platform, which will provide you with a destination URL and Stream Key.
From there, input the URL and Key into whatever destination you want to stream from.
Tip #5: Test the stream
Before going live, test the stream to verify virtual attendees will be able to see your content. Testing a stream is different on every platform, but here’s an easy way to do it with StreamYard:
- Create a private livestream to your YouTube channel.
- Once you connect your YouTube channel as a destination on StreamYard, create a broadcast.
- Next, select your YouTube channel as the destination and change the privacy menu to “private.”
- Then, you can go live, and only you will be able to see the video.
With a StreamYard paid plan, you can test things out by recording your stream instead of streaming to a destination. When you create a broadcast, select “record only.” Then you’ll be able to fully grasp the quality of your stream.
Tip #6: Monitor the stream
Now is the time for precision. You’re mission control for ensuring that overlays, presentations, and camera angles are all timed correctly for the stream. Note that on most streams, there’s typically a few-second delay.
It’s critical to monitor your stream’s health to avoid delays or lags. Connect headphones through the encoder so you can hear — and see — that everything is synchronized.
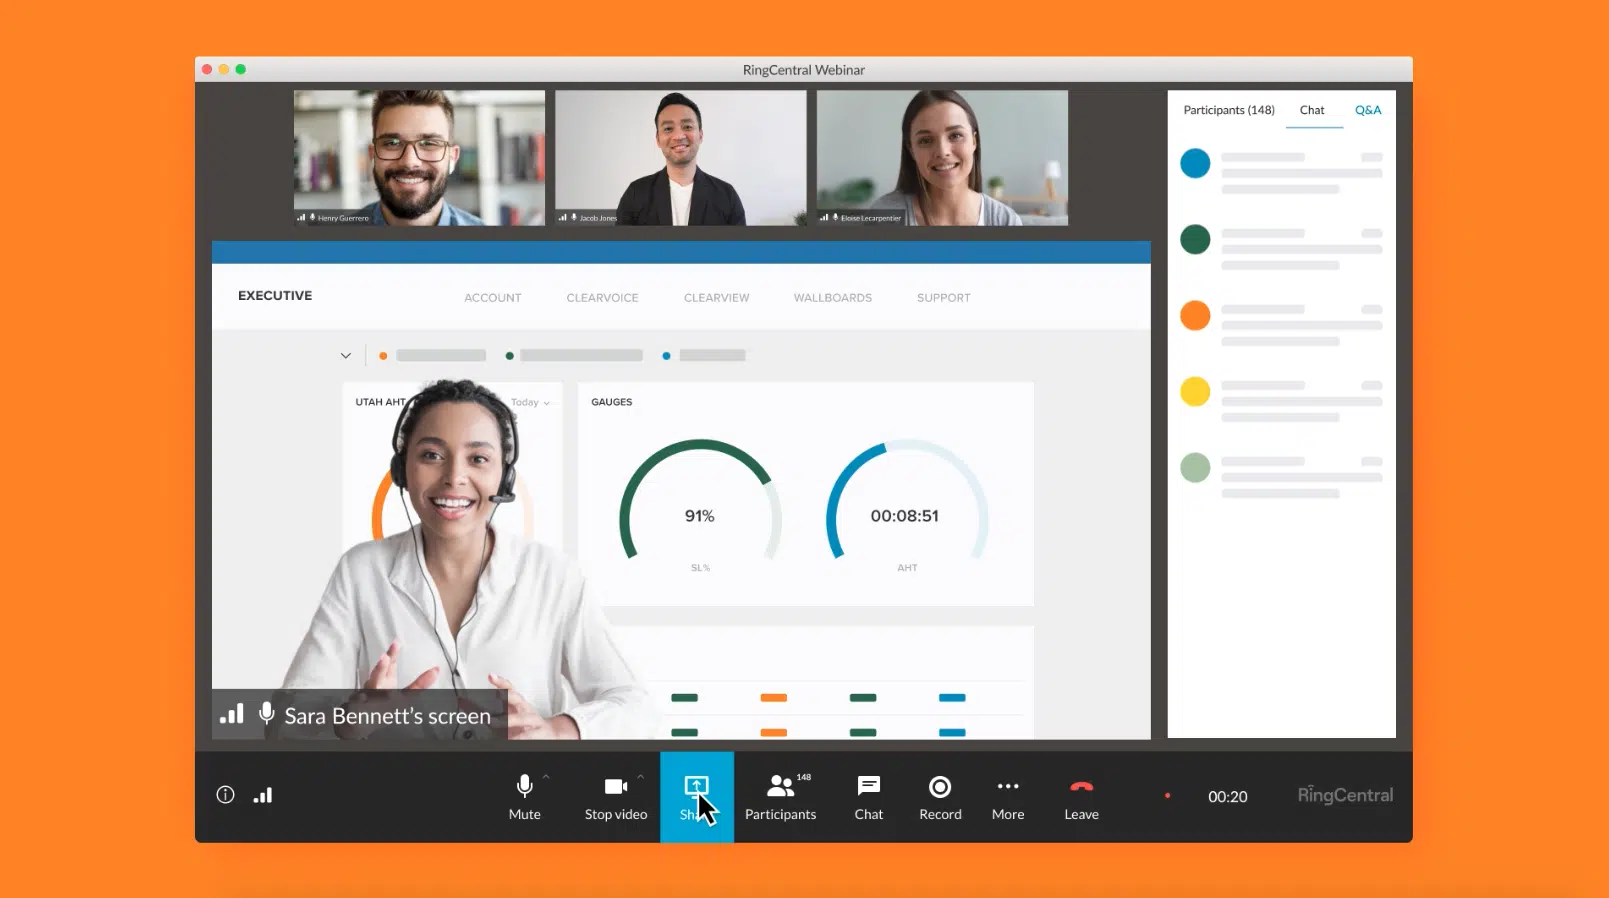
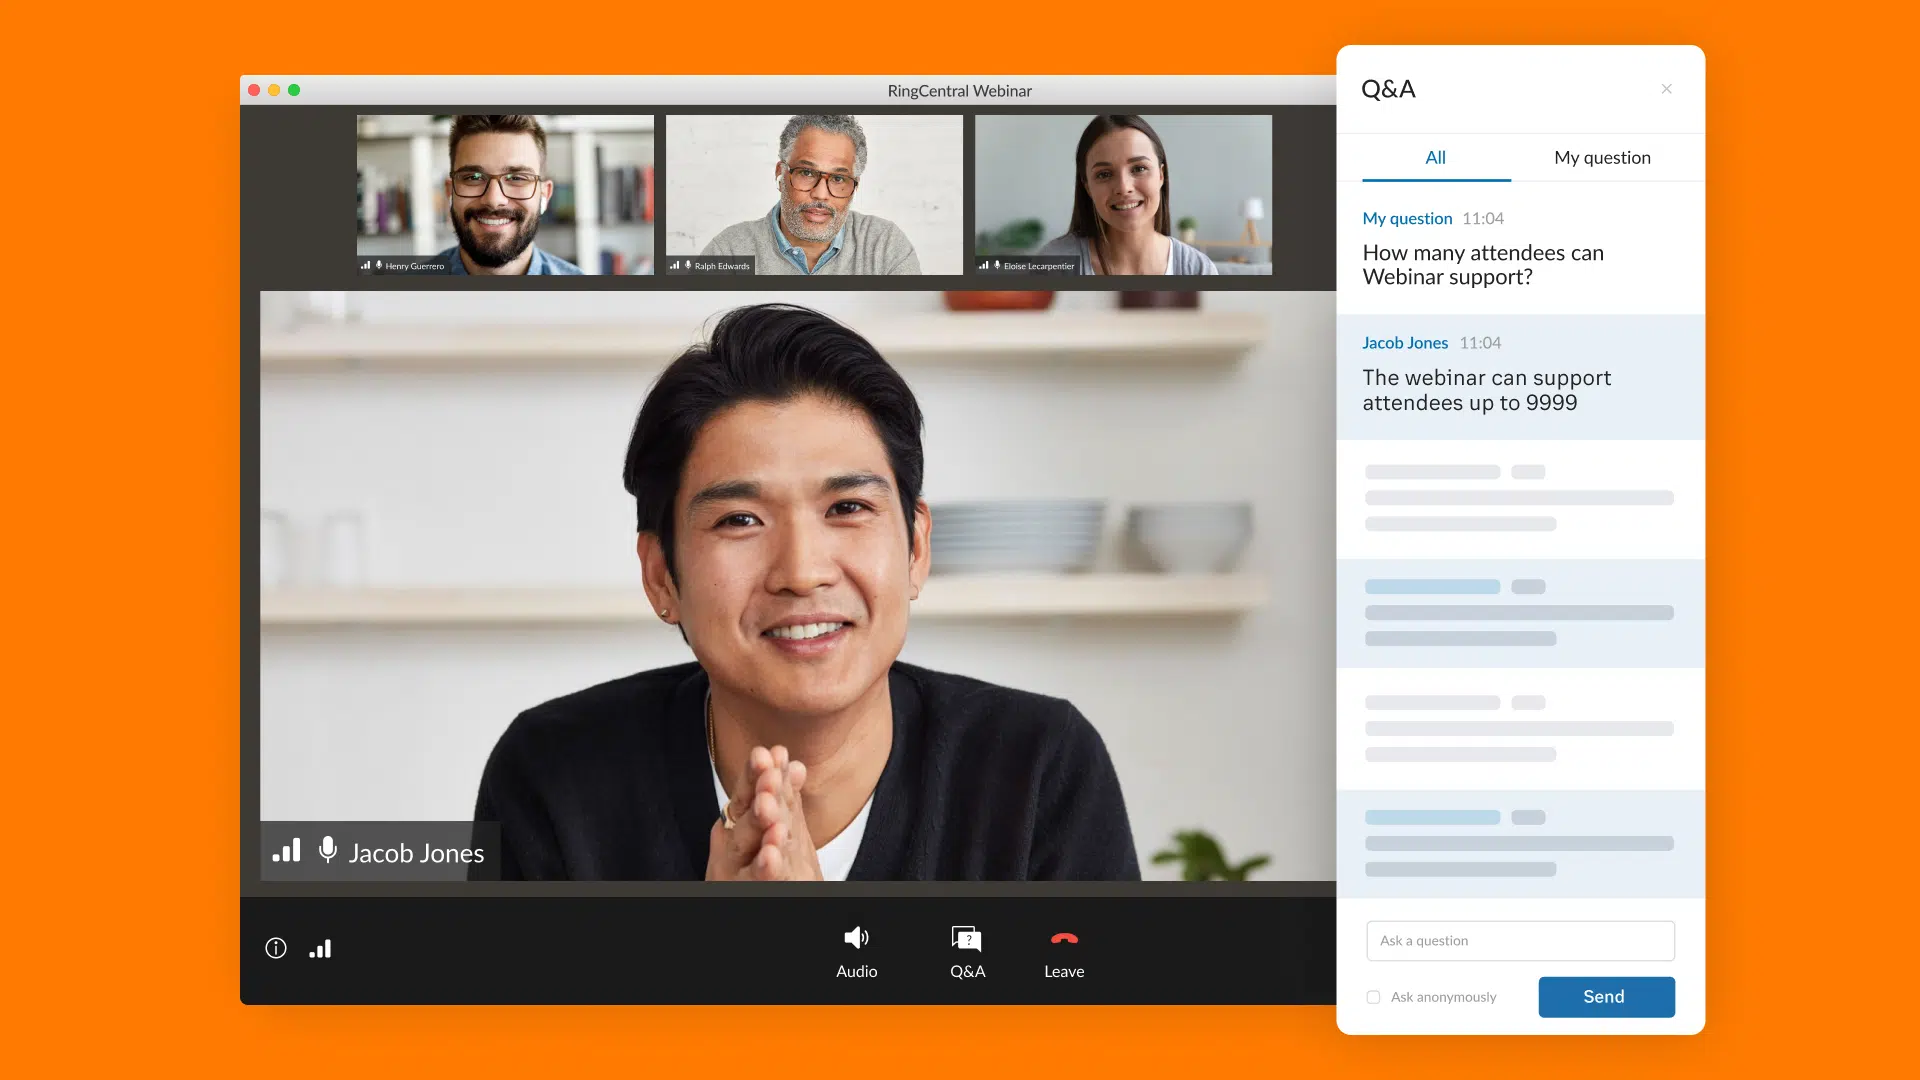
Pro tip: Get creative. Livestreams offer opportunities to pique your audience’s curiosity in real-time. Consider hosting a live Q&A, sharing behind-the-scenes footage with virtual attendees, or engaging in direct conversations with your online audience within RingCentral Events.
Tip #7: Get support
Sure, streaming is simple enough that a kid can do it. But as you level up your livestreams, there are quite a few things that can go awry.
If you’d prefer not to go it alone, consider hiring someone to handle the streaming for you. Or you can find a partner to help you create a professionally produced livestream from start to finish. The right behind-the-scenes partner helps ensure your streams are reliable and polished.
Whether it’s your first time live streaming or you already have extensive streaming experience, it’s nice to have support. Speak to one of our team members to start live streaming with RingCentral Events today.
Updated Nov 13, 2025